Mirrorless cameras now account for over 80% of all camera sales worldwide. So naturally you bought yourself a new one. But, you are now freaking out googling “how to use a mirrorless camera”?

Well, look no further. After this guide, you will have everything you need to get started. Now, without further ado, let’s go!
What is a Mirrorless Camera?
You may ask yourself what’s so different about mirrorless cameras that everybody is talking about them.
I hear you! I hear you! Don’t worry, I will explain everything you need to take great pictures. Just bear with me for a second, or go to the next section if you don’t want to read this.

Well, think of it as a minimalistic gadget with superpowers. At its heart is the image sensor – this digital thing that captures all the light coming through your lens.

Right in front of it, you find your lens mount (the part where you attach different lenses). So, the most visible components you’ll interact with are:
- The electronic viewfinder (EVF) – that small screen you look through
- The LCD screen on the back
- Various control dials and buttons (I’ll explain them later)
- The grip (where you hold the camera)
- The hot shoe on top (for attaching flashes or microphones)
How Mirrorless Cameras Differ from DSLRs?
The biggest difference is right in the name – no mirror! In a DSLR, the mirror reflects light up into an optical viewfinder, so you see exactly what the lens sees.

When you take a photo, this mirror flips up out of the way, allowing light to hit the sensor.
Mirrorless cameras skip this mechanical process entirely. Instead, the sensor is always exposed to light, so you get a live digital preview through the electronic viewfinder or on the LCD screen.

This might seem like a small change, but it leads to several important benefits:
Size and Weight: Mirrorless cameras are smaller and lighter than DSLRs.
What You See Is What You Get: The electronic viewfinder shows you exactly how your photo will be before you take it – including exposure, white balance, and other effects. With a DSLR, you had to take it first to see the exposure.
Better Video Performance: Since the sensor always provides a live view, mirrorless cameras typically offer better autofocus during video recording compared to DSLRs.

Silent Shooting: No mirror means no “clunk” sound when taking photos. Many mirrorless cameras can shoot completely silently using an electronic shutter (great for wildlife or ceremonies).
How To Use Your Mirrorless Camera?
Okay, now you took your mirrorless camera out of the box.

So, let’s talk about all the confusing buttons you see there.
Buttons Overview
Shutter Release Button (The red button)
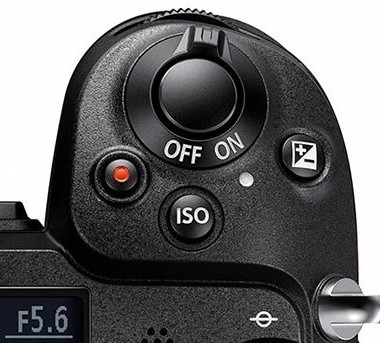
This is the most important button (no shit Sherlock!)—it’s what takes the photo. Press it halfway to activate autofocus, then press fully to capture the image.
In some cameras, you can customize this button for additional functions, such as back-button focusing (but I’ll leave that to an advanced guide).
Mode Dial

It’s usually on the top of most mirrorless cameras. This dial lets you switch between shooting modes (which we will talk about in a moment). Some cameras also include customizable modes for quick access to your preferred settings.
Control Wheels & Dials

Most mirrorless cameras have at least one control wheel, while higher-end models may have multiple. You use them to adjust settings like shutter speed, aperture, and ISO without going into the menu. Some cameras also have a command dial near the shutter button for easy access.
Shooting Modes
Most cameras have so many shooting modes that can feel overwhelming, so let’s focus on the main ones and then talk a bit about the remaining modes later:
Auto: As the name suggests, the camera does everything for you. You just click and the camera will adapt the aperture, shutter, and ISO based on the data from the sensor.

However, this is not always accurate so it’s not recommended.
Aperture Priority (Av or A): You can see this one as a semi-automatic mode, meaning that you choose the aperture and the camera adjusts the shutter and ISO accordingly.
For those of you who don’t know what is aperture. Well, WHAT DO YOU KNOW?

No, I am just kidding. Let me explain.

So, the aperture is the opening of the lens that’s measured in f-stops (dumbest explanation but does the job).
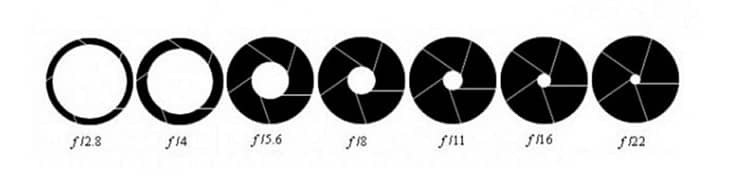
This means that a lower f-stop (like f/2.8) is large and lets in more light, and a higher f-stop (like f/11) is a small open, allowing less light to reach the sensor (it’s kinda confusing in the beginning but you will get used to it in time).
These numbers also affect depth of field, a fancy word for saying how much of the picture is in focus.
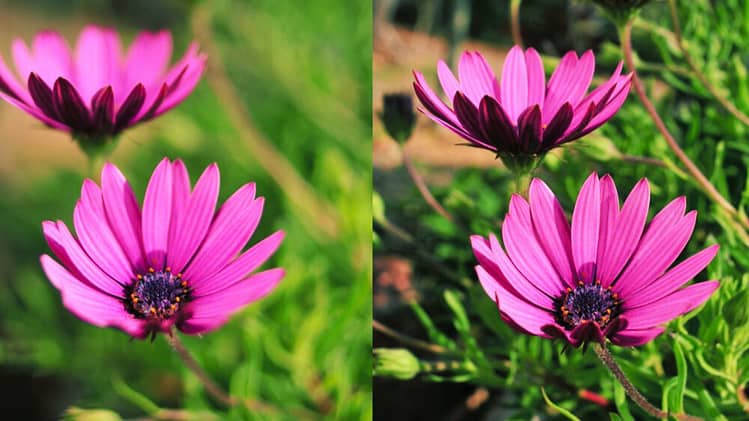
Small f-stops will give you a shallow depth of field, creating that dreamy blurry background (called bokeh), and large f-stops keep more of the scene in focus (deep depth of field), making it perfect for landscapes.
Shutter Priority (Tv or S): Similar to the previous one, but we are now playing with the shutter, and the camera adjusts the remaining settings for an optimal result.
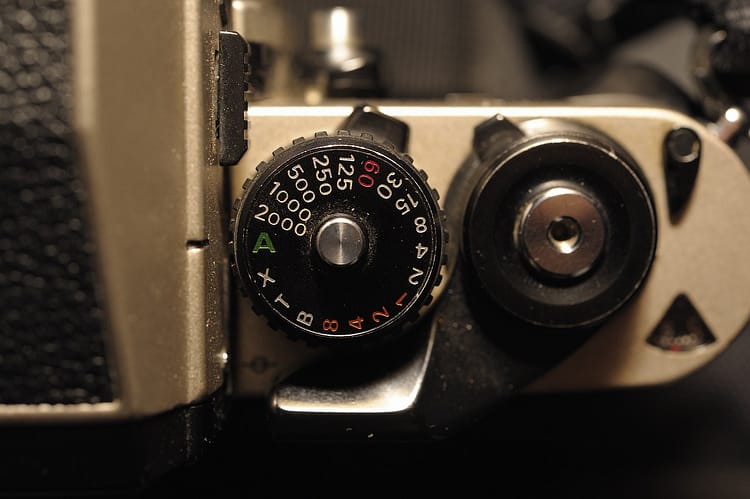
To explain shutter, I’d say think of it like your eyes blinking.

Anyways, when you blink super quickly, only a tiny bit of light enters, right? Now, keep them open a little longer—more light comes in. That’s exactly how shutter speed works for your camera.
A fast shutter speed (a quick blink) freezes motion. So, you can use it to catch a bird mid-flight for example.

A slow shutter speed (like holding your eyes open longer) lets in more light, perfect for those dreamy, low-light shots or light trails at night.

Manual: As the name suggests, you control everything. You adjust the aperture, shutter speed, and one more thing.
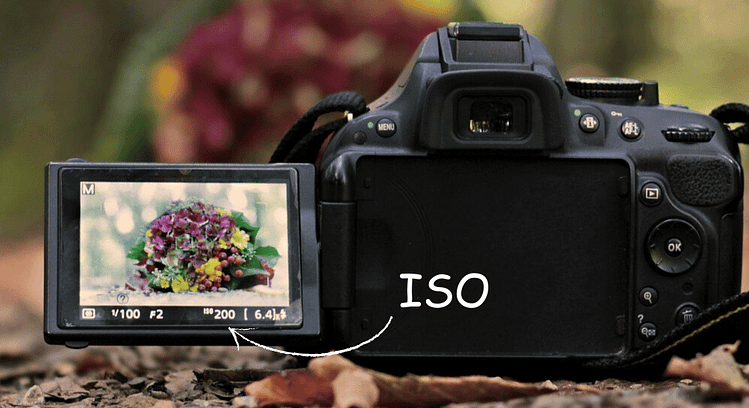
ISO controls how sensitive your camera’s sensor is to light. A low value (like 100 or 200) is great for bright, sunny days with plenty of light.
But when it’s dark, and you don’t want to use a flash, you can crank up the ISO (800, 1600, or higher). This makes your camera more light-sensitive, to see and capture details in the dark.
But you can’t just crank up the ISO without consequences. High ISO introduces digital noise, that grainy, fuzzy look that can make your photos look less BAD (something like this).

So the key is finding the sweet spot: enough light sensitivity without sacrificing image quality. Think of it like turning up a stereo – too loud, and the sound gets distorted.
Other Modes

Your camera will probably have some preset shooting modes that will be useful, especially when you are starting. They usually give good results if you are still not sure you want to use the Manual mode.
So, While the icons and exact names might vary by manufacturer, these are the common ones:
Portrait (Person): The go-to mode for photographing people. It softens the background using a wider aperture (small f-stop), making your subject stand out beautifully while adding the bokeh effect.

Landscape (Mountain): This mode increases the f stop to enhance sharpness, depth of field, and colors. This way your landscapes look vivid and detailed, from the foreground to the horizon.

Macro (Flower): Made for extreme close-ups of small subjects like flowers, insects, or intricate details. However, for the best result, use a macro lens.

Night Portrait (Person with Star): Ideal for low-light situations where you’re photographing people. This mode will use a slower shutter speed to let in more light with a flash, balancing the exposure between your subject and the background.

Action (Moving Figure): This mode captures fast-moving subjects, like athletes, wildlife, or kids running around. It uses a fast shutter speed to freeze motion to give you a sharp, clear shot.

These modes will help you see how your camera handles light, focus, and motion in different scenarios. Once you play around with them, you’ll recognize how you can achieve similar effects in manual settings, which will give you full creative freedom.
Exposure Triangle
The three components (the ones you already forgot about), which are the Aperture, Shutter, and ISO make up what’s called the exposure triangle.
If you increase the aperture (making the opening bigger), you’ll get more light, but to avoid overexposure, you’ll need to decrease the shutter speed (make it faster) or lower the ISO.
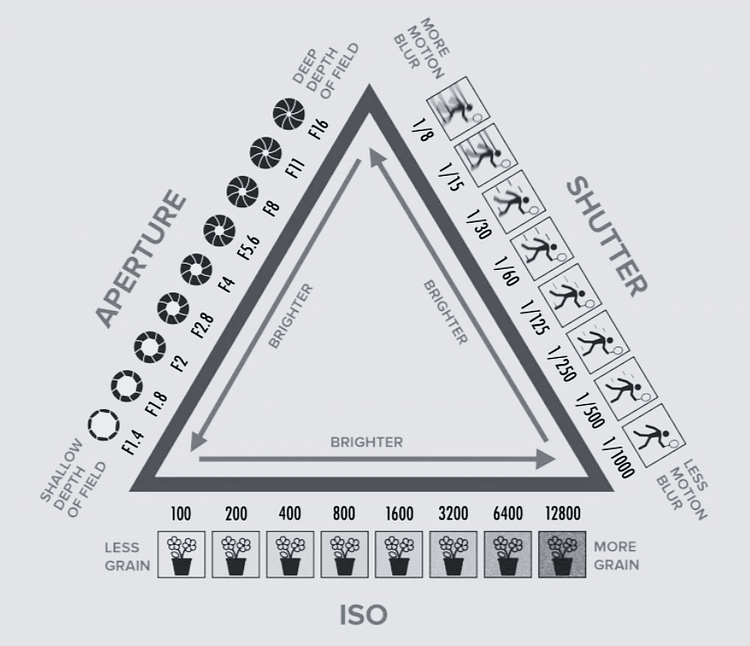
Or if you slow down the shutter speed (keeping it open longer), you’ll let in more light, so you might want to close the aperture a bit or lower the ISO to prevent your shot from being too bright.
In short, adjusting one part of the triangle affects the others, so you have to keep everything in harmony to get that perfect exposure.
Camera Metering
Metering is your camera’s way of figuring out how much light is in the scene and setting the exposure accordingly. Think of it as your camera’s “light meter” or “exposure assistant.”
When you press the shutter button halfway, your camera measures the light in the scene using its metering system and adjusts the aperture, shutter speed, and ISO to get a well-exposed shot. The goal is to make the image not too bright (overexposed) or too dark (underexposed).

There are different types of metering modes, and they decide how the camera measures light in the frame:
Average Metering: This mode looks at the whole scene and averages the light. It considers most scenes as 18% gray (a mid-tone color) and tries to balance the exposure around that.
But this creates a problem when your scene is mostly bright or dark. In these cases, the camera might not get it perfectly right because it will average bright areas (let’s say snow for example) which will make it look gray in the picture, and as far as I know, there is no gray snow. Yet, it’s a good starting point for simple, balanced photos.
Matrix/Evaluative Metering: This is the most common and smartest mode. It divides your frame into lots of small areas and checks the light in each one.

The camera then uses that info to figure out the best exposure for the entire scene. It works really well for most situations, especially if the lighting is a mix of dark and light areas.
Center-Weighted Metering: This one focuses mostly on the center of your frame, so if your subject is in the middle, it will make sure they’re properly exposed.

It still looks at the rest of the scene, but the center gets like 80% of the attention. It’s great when you want your subject in the center to look good and not get affected too much by a bright background.
Spot Metering: This mode is super focused. It measures light from a very small area in your frame, often the center or wherever your focus point is.

It’s perfect when you want to expose a specific part of the scene, like when you’re shooting someone backlit and want them to be properly exposed, even though the background is super bright.
Partial Metering: This is similar to spot metering but with a slightly bigger area. It still focuses on one part of the frame but is not as small as spot metering. It’s good when you want control over a particular area of the scene but don’t need it to be as precise as spot metering.

We can say that metering helps your camera make a smart guess about how much light is in your scene and adjusts its settings to try and create a balanced exposure. And just like our eyes, sometimes it gets it right, but you can always overrule it if you want a creative effect.
Exposure Compensation
You see that +/- button, that’s the exposure compensation. You use it to tweak how bright or dark your photos turn out without messing with the core settings (aperture, shutter speed, or ISO).
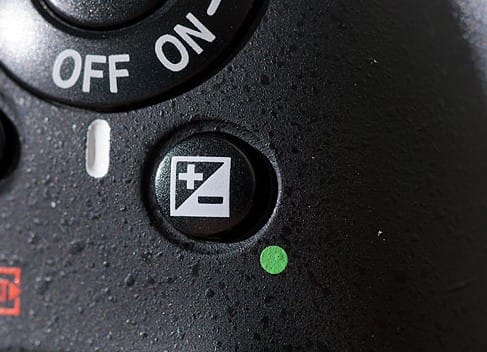
The camera usually tries to make the image look “neutral” (not too bright or too dark) using the system metering we talked about, but sometimes the scene is a little too dark or a little too bright for your liking, and that’s where exposure compensation comes in. If your camera meters a scene and you think it’s a little off, just tap that +/- button to fine-tune it.
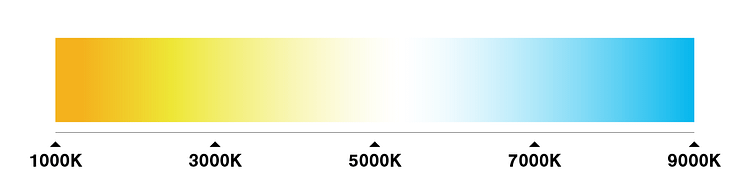
White Balance
White balance is CRUCIAL for the colors in your photo to look natural and not weird or tinted. Different light sources like a warm, yellow light from a lamp, or the cooler, blue light from a window can make your photos look too yellow, blue, or green if the camera doesn’t adjust for it. That’s where the white balance comes in.
You can use Auto White Balance (AWB) so the camera tries to figure out the best color balance for the scene automatically. But, it’s not recommended because it’s usually not accurate.
This is why photographers use white balance presets (like Daylight, Cloudy, Tungsten, etc.), we use them to tell the camera how to adjust the colors to make whites look white. It’s like making sure a white shirt in your photo doesn’t look orange under that warm lamplight.

Let me explain these presets one by one:
Daylight/Sunny preset is used outdoors in bright, natural sunlight (around midday). This preset assumes you’re shooting under neutral daylight, so it keeps the colors as they are without making things warmer or cooler.
Cloudy is used on overcast days or in shaded areas outdoors. Cloudy lighting usually makes photos look cooler (bluish) so this preset adds a little warmth to balance the colors, making your photos feel more natural and lively.
Tungsten is used indoors under warm, yellowish lightbulbs (like the ones in your living room). Tungsten light gives a strong yellow/orange cast so the preset cools things down by adding blue tones to balance it out.
Fluorescent is used indoors under fluorescent lights (like in offices or schools). Fluorescent lighting can make photos look greenish so we neutralize that by adding magenta tones, giving your photos a more natural color.
Flash is used when using your camera’s flash (like in low-light indoor shots). Flash can make photos look a bit cool (bluish), so this preset warms things up slightly to keep colors balanced.
Shade is used when your subject is in the shade outdoors, especially on a sunny day. Shady areas often have a cooler (bluer) light and this is why this preset adds extra warmth to make your photo look more natural.
Custom White Balance. You use it when none of the presets work or if you don’t want to waste time figuring out which preset is the best for you.

How Does It Work? You take a photo of something neutral (like a gray card or white piece of paper), and your camera uses that as a reference to balance the colors perfectly. This gives you full control of tricky lighting situations, and it’s by far the most accurate.
Making the Most of Your Electronic Viewfinder
Most of the things above are common between DSLRs and mirrorless cameras, but what we have here is the revolution mirrorless cameras brought with them: The Electronic Viewfinder.

Unlike the optical viewfinder of a DSLR, an EVF shows you real-time changes in exposure, white balance, and depth of field as you adjust settings.
Plus, it’s a lifesaver in low light because it will brighten the scene digitally. This way you can compose shots that would be hard to see in a DSLR. So, to get the most out of it, I recommend displaying the following settings:
- Histogram (shows exposure distribution)
- Level gauge (helps keep horizons straight)
- Basic exposure settings (shutter speed, aperture, ISO)
- Focus points
You can usually toggle these on/off through your camera’s display settings menu, and once you know what you’re doing, you can remove anything you don’t regularly use to keep your view clean.

However, EVFs can have some problems. For example, EVFs can be harder to see in bright light compared to optical viewfinders.
To fix this, I recommend increasing your EVF brightness (but remember this uses more battery) or you can use the EVF’s eyecup to block out ambient light. You can also get an eyecup extension for very bright conditions, and If your camera has it, enable auto EVF/LCD switching.
Autofocus Techniques and Settings
Before mirrorless cameras (especially the latest models), AutoFocus was a nightmare in DSLRs, especially when you need to capture something moving. But, with on-sensor phase and contrast detection autofocus, you can now capture pretty much anything.
Different Focus Modes

Single AF (AF-S): Perfect for still subjects. Mirrorless cameras show you exactly where they’re focusing in real-time through the EVF or LCD, making it easier to confirm focus accuracy.
Continuous AF (AF-C): Tracks moving subjects using your camera’s entire sensor area. Mirrorless cameras can track subjects across the entire frame, not just in specific zones like DSLRs.
Manual Focus (MF): Enhanced by focus peaking and magnification in your EVF – features unique to mirrorless cameras that make manual focusing much easier.
Eye and Face Detection AF
This is where mirrorless cameras truly shine. You can now have real-time eye tracking that works across the entire frame, detects, and tracks multiple faces simultaneously.

Plus, many cameras can now switch between eyes if your subject turns their head, AND if you want better results without a headache, you can use one of the specific modes for people, animals, or vehicles.
Common Focus Problems and Solutions
It’s all great and everything, but there are some problems that you should be aware of when you use the focus in your mirrorless cameras.

First is Focus Hunts in low-contrast scenes, and you can fix that by using your camera’s touch-to-focus feature through the LCD.
Sometimes, your camera can lose track of very fast subjects, and to fix that, I suggest you enable your camera’s subject recognition mode if available.
Another important problem in all mirrorless cameras is the battery drain. After all, you are using a lot of electronic things (from the viewfinder to continuous AF), so to prolong the battery for more shots, use Single AF when shooting static subjects, or adjust your camera’s power settings.
So, it all comes down to a game of balance: How to use the camera’s great features without draining the battery with things you won’t need.
Essential Camera Techniques for Better Photos
How To Hold Your Camera?
Now that we have pretty much covered all the technical stuff you will need to start, let’s go over some tips on how YOU affect your photos (not just your camera).
The first thing is the grip. You see, a stable grip is crucial with mirrorless cameras since they’re lighter than DSLRs, meaning you’ll need to be extra careful of keeping them steady, especially with larger lenses. So, you can use these tricks to hold it tight (we don’t want any accidents, do we?!):
- Right hand: Grip firmly with your index finger on the shutter
- Left hand: Cup underneath the lens to support its weight
- Elbows: Tuck them against your body for stability (may not be necessary as most mirrorless cameras have IBIS).
Or if you are one of us people who prefer pictures over text (I mean, who isn’t!), you can check out this video. It’s short, concise, and shows you everything:
Image Stabilization
Mirrorless cameras offer in-body image stabilization (IBIS) that works with any lens. But you need to use it right to take the most benefit from it:
- Enable IBIS when shooting handheld.
- Turn it off when using a tripod to avoid interference.
- Some cameras let you choose stabilization modes (vertical, horizontal, or both), so choose the right one according to the situation.
- If your lens has stabilization too, your camera will typically use both systems together.
Composition and Framing
Your EVF or LCD shows you exactly how your final image will look, this means we can benefit from that by following these tips:
- Use the real-time exposure preview to nail dramatic lighting
- Enable grid lines to help with composition rules
- Use the electronic level to keep your horizons straight
- The EVF shows you black and white preview if you’re shooting monochrome
- Custom aspect ratios are displayed accurately in your preview
Manage Your Files and Clean Camera
Last but not least, how to manage your files. You shot amazing pictures, and now let’s see how to keep them.

A lot of beginners (even some professionals, nothing to be ashamed of, we all faced that at some point).

Anyway, as I was saying, we face the problem of losing what we shot because of some error in the memory card.
So, to minimize that, I recommend the following:
- Get cards with high write speeds (UHS-II) to handle burst shooting
- Choose capacity based on your file format (64GB minimum for RAW shooters),
- Keep a backup card if your camera has dual slots, and
- ALWAYS format your cards in-camera, not on your computer.
How To Clean and Maintain Your Camera
Mirrorless sensors are exposed when changing lenses (there is no mirror like the DSLR), so they need regular care. This is why I recommend you keep your camera off when changing lenses (if possible of course), or face the camera down whenever you want to change lenses.

Plus, use a kit like the one in the picture to clean your sensor regularly but only if you know what you are doing. If not, I really suggest you look for a service that does that since it won’t be expensive anyway).
Update Your Camera
Firmware updates are an important thing that most beginner photographers (and videographers) don’t know about, and for good reason. You see contrary to smartphones when you get the updates directly, for cameras, there is some extra work.
You should check your camera manufacturer’s website every few months for updates and follow the instructions to update the firmware. To avoid problems, I suggest keeping the battery fully charged during updates and not turning off the camera. Also, since your custom settings will probably be gone after the update, write them down before updating.
Photo Organization and Backup
This is just a suggestion, but you can benefit from this basic workflow to hit the ground running, and shoot what you like without having to worry about managing the files:
- Transfer photos after each shoot
- Use descriptive folder names with dates
- Keep at least two backups of important images
- Consider cloud storage as an additional backup
- Delete failed shots in-camera to save space
Other than that, I recommend investing in a few things further down the road, starting with extra batteries (mirrorless cameras use more power than DSLRs as you know), a rain cover if you are going to use your camera in tough conditions, and finally a good ND filter.

Why? Well what you will realize when you take pictures (and even more with videos) is that having an overexposed shot is a reality you will face, especially when you exhausted what you can do with aperture, shutter, or ISO, and this is where the ND filter comes in. It will be a life savior, believe me.
Further Reading
Now that you’ve established a solid foundation for using your mirrorless camera, it’s time to get out there and start shooting. Remember, the best way to improve is through practice and experimentation. Start with the basics we’ve covered and gradually work your way up to more advanced techniques. Don’t forget to join our photography community for tips and tricks that can help you on your journey. Happy shooting!
If you want some further “light” reading on the ultimate war: DSLR vs. Mirrorless, check out our in-depth guide to the key differences between DSLRs and mirrorless Cameras.
You are coming from a DSLR system to a mirrorless one? No worries, you can master everything you need to mount your DSLR lenses on a mirrorless camera with no issues.
Maybe you still love your point-and-shoot camera, and you are not sure if a mirrorless camera is good for you. In this article, you will learn every difference between a point-and-shoot camera and a mirrorless one.
Okay, you are sold on mirrorless cameras and you want to know the best camera for you, and the budget you will need to buy it. Well, I recommend these articles:
- The best mirrorless cameras under $1000 for those of you with a tight budget
- The best mirrorless cameras under $2000 if you can invest in a more advanced, professional camera
